Candied Walnuts

This candied walnuts recipe is lightly sweetened, so easy to make, and so delicious. You can change up the spices to make it more savory, the options are endless!

What you will need:

¼ cup packed brown sugar

1 tsp fine sea salt

1 tsp ground cinnamon

1 egg white

1 tsp vanilla extract

4 cups (12 ounces) raw walnut halves

Directions:

Heat oven to 300°F. Line a large baking sheet with parchment paper. 

In a small mixing bowl, whisk together the brown sugar, sea salt, and cinnamon until combined.

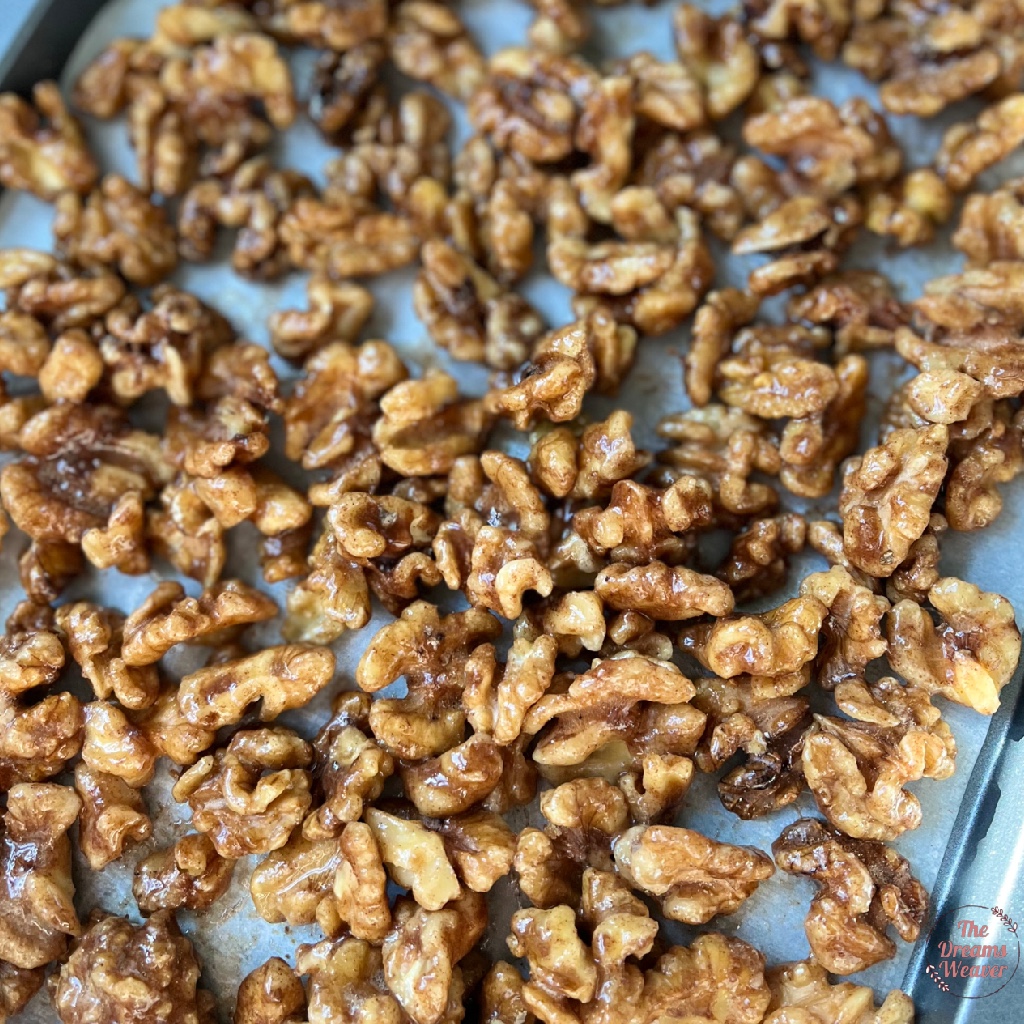
In a large mixing bowl, whisk together egg white and vanilla until combined. Add the walnuts and toss until they are evenly coated with the egg white mixture. Add the brown sugar mixture and toss until the walnuts are evenly coated.

Spread the walnuts out in an even layer on the baking sheet.

Bake for 20 minutes. Remove the baking sheet from the oven, and give the walnuts a quick stir. Return to the oven and bake for 5 more minutes. Remove and let cool for 10 minutes.

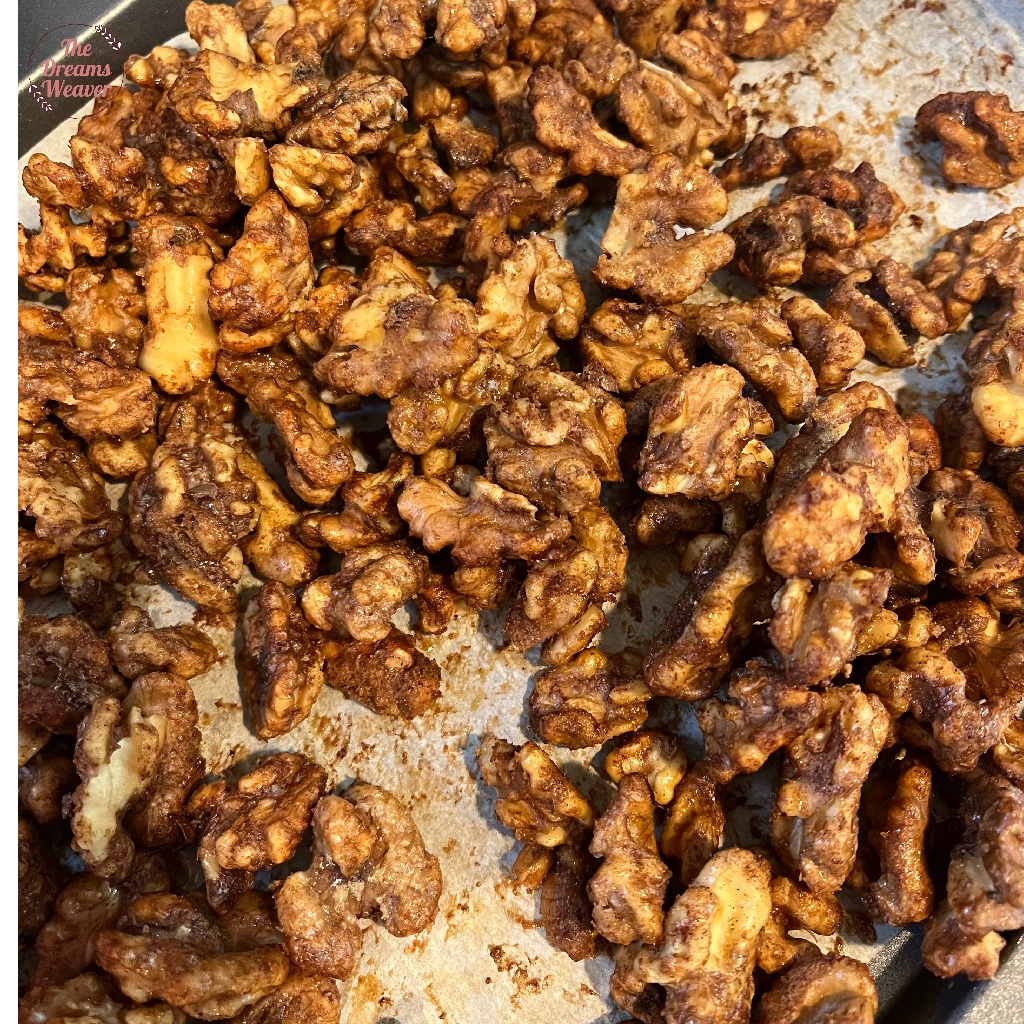
Serve immediately, or store in a sealed container for up to 2 weeks. 

Great as a snack or as a salad topper!

Enjoy!

Butternut Squash Pie

I really like how sweet and creamy butternut squash are, and am always looking for new ways to use them (and other squashes.)
I made this pie for my family get together for Chanukah and they really liked it! Can be a side, or with whipped cream for a slightly healthier dessert.

What you will need:

1 crust, store bought or homemade (recipe here)

For the Filling:

2 large eggs

1 ½ tsp vanilla extract

½ cup dark brown sugar

¼ tsp sea salt

1 ½ tsp ground ginger

1 ½ tsp ground cinnamon

½ tsp ground nutmeg

¼ tsp ground cardamom

1 ½ cups roasted squash purée

¾ cup heavy cream

Whipped cream, for garnish (optional)

Directions:

Roasted Squash Purée: heat oven to 400°. Slice into 1” sections (or buy pre cut squash to save time), coat with 1 tbsp oil, and place in a single layer on a sheet pan. Bake until tender and beginning to caramelize, about 40 minutes.

Cool slightly, blend with an immersion blender or food processor until smooth. You should have 2 ⅓ to 3 cups purée.

For Filling:

Preheat the oven to 300°.

Combine eggs, vanilla, sugars, salt and spices in a bowl with an immersion blender or food processor, and blend until smooth. Add squash purée, and blend until smooth. Pour in heavy cream, and blend to combine.

Pour filling into a hot prebaked shell, and bake for 20 minutes. Turn the oven up to 325° and continue baking for another 20-25 minutes until filling is set ⅔ of the way in from the perimeter and the center still jiggles, about 40-45 minutes total (custard will continue to cook after pie is removed from the oven). Tent Pie crust edges loosely with foil if browning too quickly.

Remove pie from oven, and cool to room temperature on rack. Garnish with whipped cream, if desired.

Enjoy!

Alfredo Sauce

Alfredo is the ultimate comfort meal, especially in the winter! This recipe is so easy to make and can be used multiple ways throughout the week for easy meals!

What you will need:

1 stick butter

1 cup heavy cream

Salt and pepper

2 cups freshly grated Parmesan

Pasta cooking water, as needed

Directions:

In a saucepan or skillet, warm the butter and cream. (This week I did not have heavy cream in the fridge, so substituted for whole milk and 1 tbsp flour and worked out perfectly!)

Season with salt and pepper. Add the Parmesan and stir until melted.

Toss to combine, thinning with pasta water if necessary.

This sauce can be used for fettuccine Alfredo, or farfalle pasta and peas! I tossed frozen peas into the pasta with sauce and just heated through for a few minutes.

I also used this sauce as a base for a white mushroom pizza. Either make pizza dough recipe here (or store bought) roll out, schmear a generous amount of Alfredo sauce, sprinkle with mozzarella cheese and sautéed mushrooms!

Enjoy!

Gelt Together Cookies

Chanukah is one of my favorite holidays! I usually make some ugly Chanukah sweater iced sugar cookies, but this year I’m all about easy recipes!

I purchased a bunch of bags of gelt from Trader Joe’s, and figured I can ‘decorate’ thick sugar cookies rolled in blue sugar with a gelt. I’ve seen similar ideas with Hershey kisses or nuts, so why not gelt? The combo works perfectly together. Make them for your Chanukah gelt together and they will be a showstopper! {see what I did there with geLt?!}

What you will need:

Sugar cookie dough (my easy recipe here)

I swapped butter for oil 1:1 here and worked perfectly

Sanding sugar or sprinkles

Gelt

Gelt Together Cookies ~ The Dreams Weaver

Directions:

Follow directions here through chilling the dough.

Once the dough has chilled, preheat the oven to 350°.

Form 1” balls of dough using a small cookie scoop or eyeballing. The dough should yield approximately 24 cookies. Flatten the balls slightly to form a disc.

Gelt Together Cookies ~ The Dreams Weaver

Roll the edges in blue sanding sugar, or sprinkles, or whatever your heart desires!

Gelt Together Cookies ~ The Dreams Weaver

Bake for 10 minutes. While the cookies are baking, unwrap your gelt. 

Gelt Together Cookies ~ The Dreams Weaver

When the 10 minutes are up, quickly press a gelt in the center of each cookie before it sets. Then return to the oven for another 2 minutes. 

Gelt Together Cookies ~ The Dreams Weaver

My son helped me with this stage, just had to remind him the tray was hot and left the oven mitt on it so he didn’t get burned.

Gelt Together Cookies ~ The Dreams Weaver

Allow the cookies and chocolate to cool completely before handling.

Enjoy!

Apple Pie Spice

Even though I am totally team pumpkin pie spice, I’ve been loving this homemade apple pie spice! It’s a deliciously festive blend of spices that’s perfect for any fall-inspired baked good, especially challahs. It’s also pretty amazing as a topping for your oatmeal, a latte, or mixing with sugar for the ultimate cinnamon toast!

Spices such as cinnamon, ginger, nutmeg and cardamom come together in this easy homemade Apple Pie Spice. This warm and comforting spice blend can be used for so much more than just apple pies!

What you will need:

4 tbsp ground cinnamon

1 ½ tsp ground nutmeg

½ tsp ground allspice

1 tsp ground ginger

1 ½ tsp ground cardamom

Directions:

Combine spices in a small bowl, mix well to combine. Store in a small jar or spice container.

Enjoy!

photo signature_zpsf75b5071.png

Honey Cookies

Every Rosh Hashana {Jewish New Year} I bake up something made from honey. Honey is used in cooking and baking around the New Year to symbolize a sweet new year. These honey cookies are sweet, moist, and chewy! And, in my opinion, tastier  and easier to make than the traditional honey cake. 

Honey Cookies ~ The Dreams Weaver

What you will need:
⅔ cup oil 
1 cup sugar 
¼ cup honey 
1 egg 
1 tsp. vanilla extract 
2 cups flour 
2 tsp. baking soda 
½ tsp. salt 
Turbinado or powdered sugar, for rolling

Honey Cookies ~ The Dreams Weaver

Directions: 
Preheat the oven to 350°F. 
In a stand mixer, beat the sugar, honey, and oil until smooth. 
Add in the egg and vanilla and mix until combined. 
Mix in the flour, baking soda, and salt. 
Refrigerate for 15-30 minutes until firm. 
Shape the dough into balls {I use a cookie scoop for equally sized cookies} and roll in the turbinado or powdered sugar, making sure to coat the whole cookie. 

Honey Cookies ~ The Dreams Weaver

Bake on a baking sheet for 7-9 minutes until the edges are light brown in color. 

Honey Cookies ~ The Dreams Weaver

Happy New Year!

photo signature_zpsf75b5071.png

Cherry Apricot Preserves

I love cherries, but sometimes fresh ones cause me to have an allergic reaction. I bought a container of them so happy they were in season, ate a few, and then had an allergic reaction. I then thought to make a preserve with them so I can enjoy them again. I paired the cherries with apricots, which compliment the cherry flavor profile well. I also added some almond extract, which I learned from my many hours of watching The Food Network, that it enhances the flavor of cherries!

This recipe is so easy and doesn’t use any pectin or preservatives! I will be using these preserves this week to stuff one of my challahs!

What you will need:

1 lb cherries, pitted and chopped

1 lb apricots, pitted and chopped

2 cups sugar

1 tbsp lemon juice

1 tsp almond extract

Directions

Wash drain and pit the cherries and apricots. Chop into little chunks depending on the texture you need. Soft cherries can be used but discolored and bruised will ruin the jam so remove those.

In a sauce pan, combine the apricots, cherries, sugar, and lemon juice. If you are using frozen cherries, let the cherries macerate in sugar and lemon juice for a few hours before cooking. This softens the skin considerably.

Cook on medium heat until the sugar is dissolved. Then, turn the heat up and let the mixture come to a boil. Let it boil for two minutes on medium-high. Boiling the jam is important as it releases pectin from the skin.

Then, turn the heat to medium-low. The jam should still be simmering but at a low simmer, not bubbling. Mash the fruit so you have a smoother jam-like consistency.

Continue to simmer for about 20 to 30 minutes more, stirring often so it does not stick to the bottom of the pan. The jam will continue to thicken as well as deepen in color as it cools. Add the almond extract once the heat has been turned off and stir once more.

Pour the jam into clean jars leaving ¼” space from the top. Use a clean knife or spatula to move the jam a bit, this will remove any air pockets.

Enjoy!

photo signature_zpsf75b5071.png

Homemade Flour Tortillas

This was my first attempt at homemade tortillas, and they are quite tasty! With Cinco de Mayo coming up, it seemed like the perfect time to try to make my own, and they come out so much cheaper and fresher than store bought.

Homemade Flour Tortillas ~ The Dreams Weaver

What you will need:
2 1/2 cups all-purpose flour
1 tsp kosher salt
3 tbsp vegetable oil
1 cup very hot water
Directions:
Stir together the flour and salt in a bowl. Mix in the oil, then slowly pour in the hot water {not boiling!}, stirring constantly. When the dough comes together, turn it out onto a lightly floured surface. Knead it gently a few times to smooth out the dough. Let the dough rest in an oiled bowl covered with a towel for about an hour.

Homemade Flour Tortillas ~ The Dreams Weaver

Heat a cast-iron skillet or frying pan over medium-high flame. Section off a piece of dough slightly smaller than a ping-pong ball and roll it out into a 5-inch circle until its extremely thin.

Homemade Flour Tortillas ~ The Dreams Weaver

Cook the tortilla on the dry skillet for about 1 minute on the first side, until it starts to brown a little, then flip it and cook for about 30 seconds on the second side. Remove from the pan and stack onto a towel. As you stack the tortillas, wrap them in the towel while you cook the next ones to keep the warm and pliable.

Homemade Flour Tortillas ~ The Dreams Weaver

Serve with breaded fish, pulled meat, chicken, pico de gallo, guacamole…the possibilities are endless! Whatever combo you choose, don’t forget a cerveza or margarita!

Homemade Flour Tortillas ~ The Dreams Weaver

Enjoy!

Matcha Challah

I love playing with new challah creations. All it takes is a few tweaks to my staple challah recipe.

For this weeks challah, and in honor of green for St. Patrick’s day, I wanted something festive with sprinkles and maybe a little healthy and green. That’s where matcha comes in. Matcha green tea lattes are so delicious! The matcha gives the challah a green hue and you can taste the earthy green tea. Plus, matcha has many health benefits, like antioxidants, but that’s not why I chose it for this week.

Matcha Challah ~ The Dreams Weaver

What you will need:

2 tbsp yeast

1/2 cup sugar

1 1/3 cup warm water

1/3 cup oil

2 eggs

1 tsp salt

1 tbsp matcha powder

4-4 1/2 cups flour

Rainbow sprinkles

Directions:

In the bowl of a stand mixer, add the yeast, sugar, and water, stir to combine. Add the 2 eggs and mix the eggs with a beater attachment. Then add the oil and mix together again.

With the mixer on the lowest speed, add flour cup by cup until the dough starts forming a ball and pulling away from the sides of the mixing bowl. At this point, swap out the beater attachment for a dough hook and add the salt and matcha powder. Keep adding flour cup by cup until the dough is no longer sticky to the touch. In total this should be roughly 4 cups of flour.

Knead the dough together by hand to make sure everything is incorporated together.

Place the dough back in the bowl and cover the top of the dough with a thin layer of oil and cover with a wet towel.

Let the dough rise until it doubles in size, this should be about an hour, or in the fridge up to 24 hours.

Punch the dough down and let it rise for another hour.

At this point, you are ready to form the challahs. I like to do simple 4 strand braids.

Once all of your challahs are formed, let them rise for an additional half hour, or up to an hour in colder weather.

Top each challah with egg wash (one egg with a little bit of water) and some rainbow sprinkles.

Bake at 350°F for 30 minutes.

Enjoy!

Coffee Filter Flowers

I am sure that I am not the only one out there that loves having bright flowers in the house, especially on gloomy winter days! However, fresh flowers are always such a hassle, and never live long enough. 
 
I have tried the fabric flowers, but they always look so fake and cheap looking no matter how hard you try! That is where my coffee filter flowers come in. To me, they look like a carnation, or a bunch of hydrangeas, maybe?  I had these coffee filters in the house and I only own a Keurig…

Coffee Filter Flowers~ The Dreams Weaver

Learning how to make paper flowers is so much fun and the creative aspects are endless! They can even be dip dyed for different affects. These homemade flowers are easy and are perfect for budget decorations, easy homemade gift ideas, or to help brighten your home. I whipped up my bunch today while watching the Food Network, they really take zero thinking. 
 
What you will need: 

  • Several coffee filters, each flower will take 6. 
  • Clear drinking straws 
  • Scissors 
  • Tape 
  • Stapler  
Coffee Filter Flowers~ The Dreams Weaver

Flaten the coffee filters so that they are easier to work with. (#1 below) 
 
Take 3 coffee filters and fold them into quarters. (#2 and #3) Now cut scallops. (#4) You don’t need to be precise, this is just adding some dimension! Do this with 3 more coffee filters; each flower will use 6 total. 

Coffee Filter Flowers~ The Dreams Weaver

Stack all 6 of the coffee filters. Scrunch the bottom up as shown in the top left photo (#5) and staple it down. 
 
Open up your flower as much as you can. It won’t lay flat but you’ll need to know where the center is. (#6) 
 
Take the top layer and scrunch it up tight, squeezing the bottom of your flower. (#7) 
 
Continue scrunching each layer, one at a time. (#8) 

Coffee Filter Flowers~ The Dreams Weaver

Lastly, staple a straw to the base of the flower and wrap some tape around it to stabilize it. 
 
Do this for each one of your flowers, until you get the amount of flowers you would like for your bouquet to have. 
 
I made a total of five flowers for mine. I also made two flowers with only 4 coffee filters to give my bouquet variation in sizes so they look more realistic. 

Sit back and enjoy your new flowers! 

Coffee Filter Flowers~ The Dreams Weaver


photo signature_zpsf75b5071.png